Drupal 8, JSONAPI and Ember Part 2: Building Out The App

Now that we have a back end set up with Drupal 8 and JSONAPI, let's integrate it into our Ember app!
Welcome to Part 2!
If you've read my last post, welcome back! If you haven't and are a little lost as to what we've done, I'd go read it here! We started by creating a basic Drupal 8 site, created a couple content types, enabled the JSONAPI module to see how easy it makes exposing content entities, and then we started an Ember app.
Now we are going to wire the Ember app to pull data from our Drupal backend.
Before we begin
Because of CORS policy, in order for our app to make successful AJAX requests to our backend, we have to tell Drupal to allow XHRHttpRequest/Fetch/AJAX requests from the origin of our app or it will deny the request.
We can do this by navigating to the sites/default directory of our Drupal 8 site. Inside will be a file called services.yml, if there isn't you can rename the default.services.yml file to services.yml. Open up this file and find the cors.config key. Adjust the values to look like this:
  cors.config:
    enabled: true
    # Specify allowed headers, like 'x-allowed-header'.
    allowedHeaders: ['*']
    # Specify allowed request methods, specify ['*'] to allow all possible ones.
    allowedMethods: ['*']
    # Configure requests allowed from specific origins.
    allowedOrigins: ['http://localhost:4200']
    # Sets the Access-Control-Expose-Headers header.
    exposedHeaders: false
    # Sets the Access-Control-Max-Age header.
    maxAge: false
    # Sets the Access-Control-Allow-Credentials header.
    supportsCredentials: false
This will allow the Drupal site to receive requests from http://localhost:4200 (which we will need for testing in our Ember app since the Ember dev server serves it up on localhost on port 4200).
I highly recommend using the Ember Inspector extension for your browser (Chrome, Firefox, Opera(!)) or you can save it as a bookmarklet. It really helps debug problems as well as seeing what your route is, what's in the model, which template is being rendered and so forth.
Ember Conventions
The big difference between Ember and other javascript MV frameworks, (React, Angular, etc) is that Ember favors conventions over configurations. For example, *every Ember project's directory structure will be very similar. Routes are defined in the routes directory, models are defined in the models directory, etc.
The advantage here is that spinning up and starting an Ember app is incredibly fast! Starter apps and "boilerplate" code aren't really needed. Ember also has a huge community following, which means tons of libraries and plenty of guides to help you learn your way around!
Extending JSONAPI Adapter
Ember Data is the de-facto Ember library for fetching, storing and retrieving data in your app. It uses adapters and serializers to fetch data from a backend and then create records you manipulate within your app. You can check out it's documentation here. The good news here is that Ember Data works with the JSONAPI spec right out of the box!
For starters, in order for us to fetch data from our Drupal site, we have to tell our JSONAPI adapter what the URL to our backend is. We can easily do this by using the Ember CLI Generate commands to create item. So from inside our emberapp directory let's run this command: ember g adapter application.
The first thing you will notice is that inside the app directory it created a new directory called adapters with our application.js file inside. The application filename is one example of Ember's conventions. When you want to override an adapter, Ember will first look inside the adapters directory for an application.js file to load any overriding adapter. If you open this file it should look like this:
import DS from 'ember-data';

export default DS.JSONAPIAdapter.extend({
});
If you read up on the JSONAPIAdapter here you'll see that we just need to define a property called host to store our local URL to our Drupal 8 site. For me this will be http://decoupled-drupal.dev, but this value will depend on your local set up for Drupal sites. So now my application.js looks like this:
import DS from 'ember';

export default DS.JSONAPIAdapter.extend({
  host: 'http://decoupled-drupal.dev'
});
Now if you don't have the dev server running, go ahead and cd into the emberapp directory and call ember serve or ember s. Now checkout localhost:4200 in your browser to make sure your Ember app is running. You should see the "Congratulations, you made it!" screen right now. This is just a default screen the app includes when first created so you can easily see that the app is indeed running.
Ember Data Models
The Ember Data Store works by letting you define models that you can then fetch from the Store. For example: To start we want to grab our Blog Post items from our Drupal 8 site. So let's start by defining our blog post model.
ember g model blog-post
(By ember conventions, avoid using underscores for model names. So since our Drupal content type machine name is blog_post we called our model blog-post to keep some consistency)
Now you should have an app/models directory with a blog-post.js file inside. It should look like this:
import DS from 'ember-data';

export default DS.Model.extend({

});
Models simply define the key names we want for the Models properties and then tell it what type of property it is. For example we want to get the blog post title. So if we want to get that as part of our model we define it like so:
import DS from 'ember-data';

export default DS.Model.extend({
  title: DS.attr('string')
})
Here you can see the define the property of title and tell it what type of attribute it is. In this case it's a string. Ember Data gives us the .attr() function to let the Data Store know what kind of value can be stored in the title attribute. If you want to see the list of built-in types check it out here.
So now let's see if we can pull in our blog posts!
Setting the Model for a Route
For Ember, the URL location is tied to a Route. The Route is in charge of loading the proper model and template for the associated route. Right now we just want to use the front page of our app, so we will create a special route called application with ember g route application. This route is another one of Ember's conventions and this route is entered when the app first boots up.
Each Route has a model hook that gets called when the matching route path is accessed. Since we are using the application route, the model hook of that route will get called when the app boots up. So let's update the app/routes/application.js route to look like this:
import Ember from 'ember';

export default Ember.Route.extend({
  model() {
    return this.get('store').findAll('blog-post');
  }
})
Here's what is happening here: we are telling this route what the model should be when this route is accessed. The this.get('store') bit is going to grab the Ember Data Store object. The Data Store has a method called findAll that accepts a model name and then tries to grab those records from the Store. Since the filename of the model is blog-post.js then blog-post is the name of our model.
Now if we check out our front page... we notice an error in the JS console. You'll notice that there was an XHR request to http://decoupled-drupal.dev/blog-post (Your may look different based on how your local Drupal sites are set up). If you remember from part 1, the proper path to our JSONAPI endpoint for our blogs is http://decoupled-drupal.dev/jsonapi/node/blog_post. Fortunately someone has already made a small Ember add on to resolve this! Let's back out to the emberapp directory and run ember install ember-data-drupal. (The Ember install command is like doing an npm install.)
This add on will let us match our Drupal entity types to our models. (Currently there is an issue with the field mappings so we are just going to use the Entity Type/Bundle helper). Now if we navigate to our config/environment.js file we can set up a environment property that will map our models to the corresponding entity/bundle in Drupal. So add this to your environment.js file:
module.exports = function(environment) {
  let ENV = {
    ...
    drupalEntityModels: {
      "blog-post": {
        entity: 'node',
        bundle: 'blog_post'
      }
    }
    ...
  }
What this does is set up an environment value that can be access by simply importing this file. The Ember Data Drupal addon will lookup these values and find out the matching Drupal JSONAPI endpoint. I.e. for our blog post model it will now try and make the XHR request to http://decoupled-drupal.dev/jsonapi/node/blog_post. Let's make sure that works!
If you go back to your app and reload the page... you'll find it still doesn't work! The problem is that our application adapter is still using the standard JSONAPIAdapter. So let's open up our app/adapters/application.js file and change it to look like this:
import DrupalJSONAPIAdapter from 'ember-data-drupal/adapter';

export default DrupalJSONAPIAdapter.extend({
  host: "http://decoupled-drupal.dev"
});
Now we are using the DrupalJSONAPIAdapter instead of the standard JSONAPIAdapter. Now if we reload the app... we have another error! There should be an error related to the type value of "node--blog_post". This is because some of the values coming from the Drupal site need to be serialized slightly differently. Turns out the Ember Data Drupal add on has a serializer too! So let's use that. From inside you emberapp directory run ember g serializer application (remember the application.js is just a special name for the loading a default object/class/file).
Update the app/serializer/application.js to look like this:
import DrupalJSONAPISerializer from 'ember-data-drupal/serializer';

export default DrupalJSONAPISerializer.extend({
});
We don't need to pass any option to the serializer as we just want to use the default DrupalJSONAPISerializer. Now if you reload the app you should see the Ember hamster at the front page! Success! Now let's render out that blog post!
Templating in Ember
Ember uses Handlebars for it's templating engine. Hopefully you took some time to look over their docs and have a basic understanding of the syntax. If not, I recommend reading up on that now. So if we inspect our blog posts with the Ember Inspector we can see that the attributes of each one matches our app/models/blog-post.js definition. We should see an id as well as a title attributes with values. id is provided by default as the JSONAPI standard requires that each resource have a unique identifier. For Drupal 8 using JSONAPI that would be the entity's UUID (which is exposed as the id value).
You will notice inside app/templates there is an index.hbs and an application.hbs template. Without going overboard on information, just note that the application.hbs template is the main entry point of the app and all other templates/components will be rendered inside that one. The index.hbs template on the other hand, for now just take note that the name identifies that this will be the template that renders at the index of our current route.
You will also notice the {{welcome-page}} at the top of the application.hbs template. This is where the "Congratulations, you made it!" page is coming from. You can remove that line. Next is the {{outlet}} line. This is a helper that will render out any child templates. Another way to think about this is that each template will be rendered into the {{outlet}} if it's parent route's template.
But before we go too deep into the templating (next blog post!), let's just get some properties from these blogs rendered out! In your application.hbs template let's add this:
{{#each model as |blog|}}
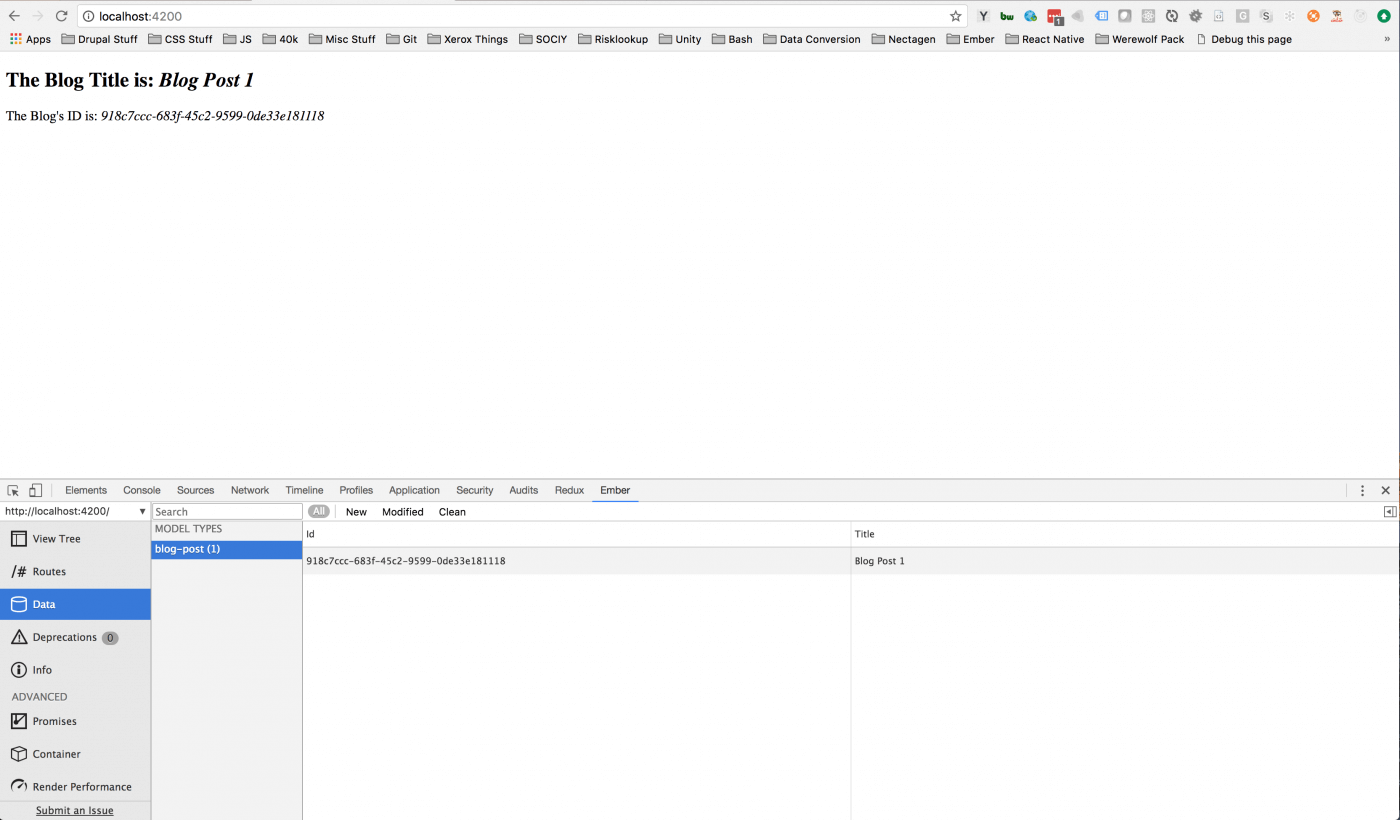
<h2>The Blog Title is: <em>{{blog.title}}</em></h2>
<p>The Blog's ID is: <em>{{blog.id}}</em></p>
{{/each}}
{{outlet}}
The {{#each}} is a helper that allows us to loop over enumerable properties in the template (object properties, arrays, object of objects, etc etc). Think of it like a forEach loop in Javascript. The syntax is: {{#each [name of enumerable property] as |[name of variable you want]|}}. The model property here is actually set in our route's model() hook. Side by side here is the route and the template: app/routes/application:
import Ember from 'ember';

export default Ember.Route.extend({
  model() {
    return this.get('store').findAll('blog-post');
  }
});
app/templates/application.hbs:
{{#each model as |blog|}}
  <h2>The Blog Title is: <em>{{blog.title}}</em></h2>
  <p>The Blog's ID is: <em>{{blog.id}}</em></p>
{{/each}}
{{outlet}}
Since the this.get('store').findAll('blog-post'); will return us an array of blog-post items we can just return it to the model() hook which then set's the route's model property equal to the result. Now if you navigate to the top directory emberapp and run ember s it will serve up your app on http://localhost:4200. You should see something like this: . Yay!
Getting an Ember app set up and working with any backend using JSONAPI is straight-forward and requires very little "glue" code to hook things up!
Up Next...
In the next blog we will create all the routes for our entities in Drupal and we will also discuss relationships on models as well as showing off how easy it is to access items from an entity reference field in Drupal on the app without having to do any extra coding thanks to the hard work of Ember Data!

Want to talk about how we can work together?
Ryan can help