Creating an easy to use bookable calendar in Drupal
Whether you're a mall trying to take reservations to see Santa, a voice teacher giving lessons, or a doctor's office letting people book appointments, there are many reasons you would want to allow users to claim a spot on a calendar. Of course, if you already have a Drupal website, there already are a couple of options for allowing online bookings or taking appointments. Still, they all seem over-complicated or too much work to get it running. For example, you could just do a custom Webform with some code to probably do everything if you're small enough. That's why Code Koalas created the Drupal module Bookable Calendar, which has been used thoroughly by our client Crown Center accepting over 30k bookings over a single holiday season without issue. It has also been picked up by some people in the Drupal community and used for their needs.
What makes this better than what exists already
Bookable Calendar sets out to be as close to a one-click setup as possible while still being flexible and powerful enough to be useful. It is Drupal, so there is no one-click install, but once it's installed, you only need to configure two entities before you're ready to let people start booking time.
Getting started
Once you have the module installed, you will see new options under the admin menu of "content" and "structure" for "Bookable Calendar" for now, you'll want to click on Bookable Calendar under the content menu. From there, you'll go to the main content section for all the Bookable Calendar things. Then you can create your first Bookable Calendar. Think of this as a single type of calendar you want for many people. You'll only need one of these ever, but if you want different things that people can book simultaneously, you'll end up creating multiple bookable calendars. So, on that create page, you'll see all the first required to create your first Bookable Calendar.
- Title: The visible title of this calendar to the admins and on the front end to users, depending on what theming you end up going with
- Description: If you need text to show up below the title explaining what the calendar is or telling people to show up 15 minutes before their scheduled time.
- User Notification Email: Should this send emails to users when they book a time slot, it defaults to yes.
- Override default user email: The module creates some basic user emails, which you can edit site-wide or specific to this calendar if you turn this setting on.
- Admin Notification Emails: Should we notify admins when a slot gets booked, defaults to yes
- Notification Email Recipient Role: Choose which admin roles will get emails
- Notification Email Recipients: If you want to add extra emails that get notifications on top of by role or instead of
- Max Party Size: What is the largest amount of bookings a single user can claim per opening? This limits a single user from claiming all 10 to themselves.
- Slots Per Opening: The number of Bookings that can claim a single opening. For example, if your event has hour-long openings, you let people register, and you can handle ten people per hour; set this field to '10.'
- Treat Slots as Parties: This will change the math of "Max Slots" to "Max Parties." This will allow you to only have 3 different groups claim a slot, but each group can have as big of a party as your Max Party Size limit.
- Booking Future Time: How far in the future from now are people allowed to register? This would stop people from registering for events over a month away.
- Booking Lead Time: How close to now are people allowed to register? This would stop people from registering for same-day events.
Once you have all those fields filled out, or you just went with defaults all the way down and save it, you have successfully created your first calendar! Now you need to create an opening for your calendar that people
can claim. If you go back to the Content > Bookable Calendar page, you can then click on the sub-menu of "Calendar Openings" go there and create an opening. The Openings are pretty simple, and have the following fields.
- Title: Visible title only to Admins of the site, so name it something useful to you.
- Bookable Calendar: This is a reference to what calendar this opening belongs to
- Date: What date and time do you want people to be able to book.
The big thing to talk about here is the date field. The date field Bookable Calendar uses is Smart Date it's great and gives us tons of flexibility. What I generally suggest for the date is to create a single date field that's repeating and handles everything you could possibly want. For example, you can pretty easily set it to be "every 30 minutes from 9 am-5 pm Monday - Friday but not between 12 pm-1 pm from today to the end of next month" all with Smart Dates very useful and easy to use repeating date field widget. Once you're done there, and you save, you now have a bookable calendar with openings that now users and book!
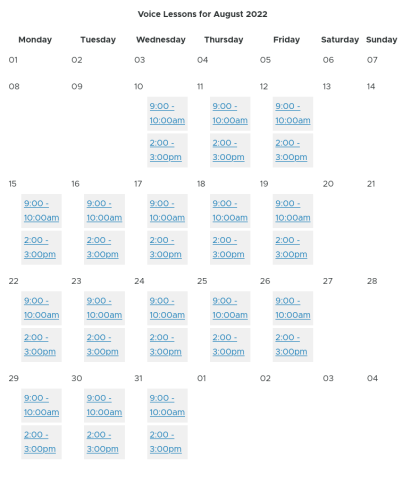
Front End
Currently, there are a couple of options for layout on Bookable Calendar. By default, if you go to an individual Bookable Calendar page, you will see the title and description you wrote and a list of all the openings with "book" buttons on them a user can click. You can easily extend templates and make it look how you want, or use Views to lay them out how you want. There is a newer module Calendar View which is my current suggested front-end if you want a calendar-type display. If you're a fan of Fullcalendar currently on the dev branch with an issue tracking it on Bookable Calendar, there is support for using that with instructions on how that works.


Want to talk about how we can work together?
Ryan can help